

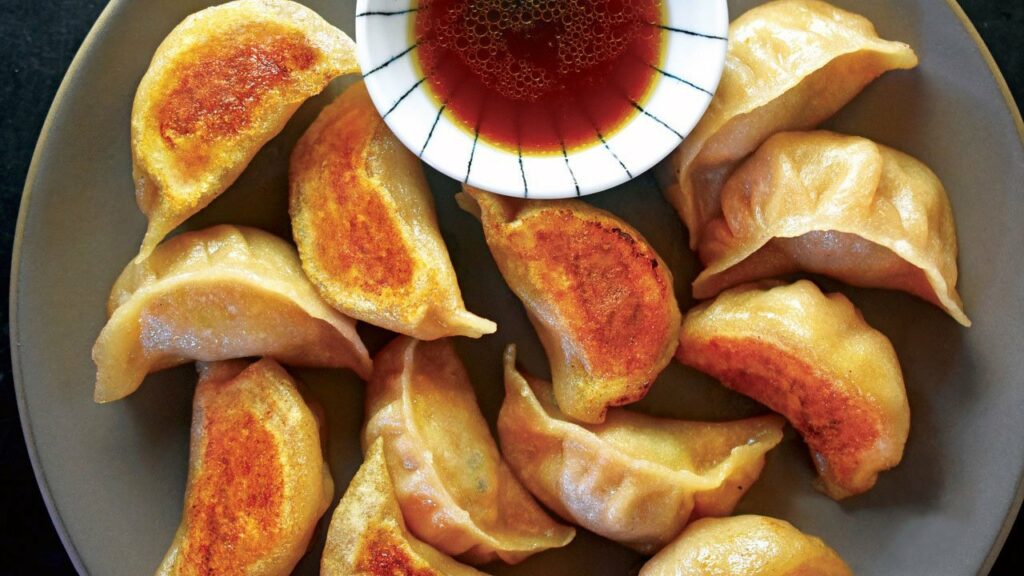
 Homemade dumplings are the physical embodiment of the love Asian moms have for their kids. I still think fondly about wrapping dumplings with my mom and grandma at our kitchen table, and happily gobbling ‘em up (the dumplings, not my family) as soon as they left the frying pan. Who could resist these delicate little purses filled with tender meat, sizzled to golden perfection and dipped in a vinegary sauce?

Paleo Pot Stickers
Ingredients
Filling
- 3 large dried shiitake mushrooms
- 1 small (1-pound) head Napa cabbage
- 1 tablespoon Diamond Crystal kosher salt, divided
- 1 pound ground pork
- 1/4 cup chicken broth
- 1/2 cup minced scallions
- 1 teaspoon minced fresh garlic
- 1/2 teaspoon ground ginger
- 1/2 teaspoon ground white pepper
- 1 tablespoon coconut aminos
- 1 teaspoon toasted sesame oil
Wrappers
- 3 cups (384 grams) cassava flour
- 3/4 cup (96 grams) arrowroot powder
- 1 1/2 teaspoons Diamond Crystal kosher salt
- 2 1/4 cups boiling water
For Cooking
- 1/4 cup avocado oil for pan-frying, divided
- 2 cups boiling water for pan-steaming, divided
For Dipping
- 1/2 cup Dumpling Dipping Sauce
Instructions
- Start by making the filling. In a bowl, soak the dried shiitake mushrooms in water for at least 30 minutes or up to 8 hours in the refrigerator until they’re completely rehydrated.
- While the mushrooms are soaking, finely chop up the Napa cabbage head. Alternatively, you can pulse it in a food processor.
- Combine the finely chopped cabbage and 2 teaspoons of kosher salt in a large bowl and toss well.
- Transfer the salted cabbage to a fine mesh strainer or colander and set it over a bowl. Let it stand at room temperature for at least 30 minutes or in the fridge for up to 8 hours.
- When you’re ready to make the filling, grab the soaked shiitake mushrooms and squeeze out the excess liquid. Remove and discard the tough stems and finely dice the caps.
- Dump the salted cabbage onto a large cheesecloth or clean dish towel. Gather up the edges and squeeze and twist the cabbage bundle to wring out as much liquid as possible. You should end up with about 1 cup of cabbage.
- In a large bowl, add the ground pork and chicken broth. Use your hands to mix the pork with the broth until the liquid is incorporated into the meat.
- Toss in the drained cabbage, mushrooms, minced scallions, minced garlic, ground ginger, white pepper, and the remaining teaspoon of salt. Add the coconut aminos, and sesame oil.
- Use your hands to knead the filling until everything is well-mixed and starts to feel tacky and sticky.
- To check the seasoning, fry up a tiny patty of the meat mixture in a pan and taste it. Add more salt if needed. If you’re not cooking right away, you can store the filling in a sealed container in the fridge for up to two days.
- It’s time to make the dough for the wrappers. In a large bow, combine all the ingredients for the wrappers except the boiling water.
- Pour in about 2 cups of boiling water and stir it in. Once the water cools down enough to touch, use your hands to knead the dough.
- Continue adding a little boiling water at a time and knead it until you form a springy, not-sticky dough.
- If it seems extra dry, add a touch more water, but watch out: you don’t want a wet, soft dough, or you’ll have trouble working with it. If it gets too wet, knead in a bit more cassava flour. When in doubt, err on the side of being a little stickier than drier.
- Divide the dough ball into thirds, and then divide each smaller ball in half to produce 6 dough balls. Next, divide each of the 6 dough balls in half, then in half two more times. Got it?
- If you follow step 15 correctly, you should have 48 equal-sized balls.
- Cover the dough balls with a damp kitchen towel to keep them from drying out.
- Now, it’s time to gather your friends and family to help assemble the wrappers and pot stickers!
- Assign someone to portion out the fillings. This step will ensure that you have exactly enough filling for the wrappers. Scoop out a scant tablespoon of filling and place the oval-shaped filling on a plate.
- Repeat until you have 48 equal oval-shaped portions.
- Next, let’s form the wrappers. Grab a tortilla press, some parchment, a rimmed baking sheet, a damp kitchen towel, and a small bowl of water.
- Take one of the dough balls and dab it with a little water if it feels dry. Then, use your hands to roll it into a round ball.
- Place the dough ball on the tortilla press in between pieces of parchment paper, and smush flat.
- The resulting wrapper should be very thin, about 3½-inches in diameter.
- Put the pre-scooped filling into the middle of the wrapper. Make sure your fingers are clean or it’ll be hard to fold properly!
- Fold up the sides of the wrapper around the filling like a taco.
- Use your thumbs to keep the filling in place while using your other hand to carefully pleat and crimp one side of the pot sticker as you press together the wrappers edges to seal the filling inside.
- Continue pleating only one side of the wrapper and sealing the top of the pot sticker until you reach the other side.
- Use your fingers to securely seal the top of the pot sticker, dabbing on a little water if the edges feel dry.
- The finished pot sticker should have a flat bottom and form a crescent with the pleats on the outside.
- Place the pot stickers on a parchment lined rimmed baking sheet and cover them with a damp kitchen towel to keep them from drying out. Continue making and stuffing wrappers until you have 48 dumplings.
- At this point, you can either freeze the uncooked pot stickers (in a single layer in a food-safe freezer bag) for up to 2 months or cook them up right away. You can fry them directly from the freezer when you’re ready to eat.
- Now, let’s fry up some pot stickers! Heat a 10-inch heavy-bottomed skillet over medium-high heat. When the pan is hot, add a tablespoon of avocado oil. Place as many pot stickers into the pan that’ll fit in a single layer.
- Fry the dumplings until the bottoms are golden-brown, about 2 minutes.
- Carefully pour in a ½ cup of boiling water and quickly cover the skillet with a tight-fitting lid. Reduce the heat to medium and steam-fry the dumplings for 5 minutes (7 minutes if cooking from frozen).
- When the timer goes off, remove the lid. Continue cooking for 1 to 2 minutes to cook off any remaining liquid and to re-crisp the bottom of the pot stickers.
- Transfer the cooked pot stickers to a plate and repeat the process until you’re done. If desired, serve the pot stickers with Dumpling Dipping Sauce. Eat ‘em while they’re hot!
Notes
 Excerpted from Nom Nom Paleo: Let’s Go! © 2022 written & photographed by Michelle Tam & Henry Fong. Reproduced by permission of Andrews McMeel Publishing. All rights reserved.